『机器学习系统』Ray使用文档 问题
ray的用法做个拆解,弄清ray的基础原理和用法
着重介绍利用ray如何部署 vLLM?比如怎么启动ray,怎么启动多个vLLM实例,多个dp rank 怎么调用它?
Ray是什么 Ray是一个开源分布式计算框架,为AI等上层应用提供了并行处理的计算层 ,大幅降低分布式工作流程的复杂性。
可以跨多节点和GPU并行和分配ML的工作负载
可以提供计算抽象(统一的API)进行ML系统的扩展集成
自动处理关键流程,如编排,调度,容错,自动缩放等。
大量的库都使用Ray作为并行执行的组件
Ray的基本原理 Ray Core Task(任务): 异步执行的Ray函数称作“任务”,也成为Ray远程函数。当一个新的Task被实例化时,会创建一个新的进程(worker)进行对其的调度。Ray使任务能够根据CPU,加速器等资源来指定其资源需求。
使用方式:
1
2
3
4
5
@ray.remote def fun (a ): return a obj_ref = fun.remote(a) value = rey.get(obj_ref)
同时,远程对象引用也可以当作参数传递:
1
2
3
4
5
6
@ray.remote def function_with_an_argument (value ): return value + 1 obj_ref2 = function_with_an_argument.remote(obj_ref) assert ray.get(obj_ref2) == 2
此时,第二个任务取决于第一个任务的输出,因此第二个任务要等待第一个任务执行完毕才开始。若调度在不同的设备上,则结果需要通过网络传输。
Actors(参与者): 将函数扩展到类,参与者本质上是能存储状态的函数/服务。当一个新的Actor被实例化时,会创建一个新的进程进行对其的调度。同样,参与者支持CPU,加速器和自定义的资源请求。
使用方式
1
2
3
4
5
6
7
8
9
10
11
12
13
14
15
16
17
18
19
20
21
22
23
@ray.remote class Counter : def __init__ (self ): self.value = 0 def increment (self ): time.sleep(1 ) self.value += 1 print (f'counter: {self.value} ' ) return self.value def get_counter (self ): return self.value c = Counter.remote() for _ in range (10 ): print (f'scheduler: {_} ' ) c.increment.remote() print (ray.get(c.get_counter.remote()))
输出为:
1
2
3
4
5
6
7
8
9
10
11
12
13
14
15
16
17
18
19
20
21
scheduler: 0 scheduler: 1 scheduler: 2 scheduler: 3 scheduler: 4 scheduler: 5 scheduler: 6 scheduler: 7 scheduler: 8 scheduler: 9 (Counter pid=32160) counter: 1 (Counter pid=32160) counter: 2 (Counter pid=32160) counter: 3 (Counter pid=32160) counter: 4 (Counter pid=32160) counter: 5 (Counter pid=32160) counter: 6 (Counter pid=32160) counter: 7 (Counter pid=32160) counter: 8 (Counter pid=32160) counter: 9 (Counter pid=32160) counter: 10 10
Objects(对象): 在Ray中,任务和参与者在对象上创建和计算,将这些对象成为远程对象。它们可以存储在Ray集群的任何位置,并通过对象引用(指针)来引用它们。
远程对象可以被缓存在Ray的分布式共享内存中,集群的每个节点都有一块共享内存,同时一个远程对象也可以存放在多个节点中。
创建对象引用的两种方式:
remote函数调用获取返回值的对象引用
ray.put()将某对象放置于Ray的共享内存上并返回在该共享内存上的远程对象引用
Env Dependency(依赖环境): 每个节点需要相同的依赖环境,Ray提供两种方案:
静态依赖时,在运行前使用Ray Cluster Launcher将依赖打包
动态依赖时,使用Ray的运行时依赖环境,在运行时安装仅对Ray应用可见的包
1
2
3
runtime_env = {"pip" : ["emoji" ]} ray.init(runtime_env=runtime_env)
Scheduling(调度) :对每个任务和参与者都有指定的资源需求。
资源:
节点的资源:
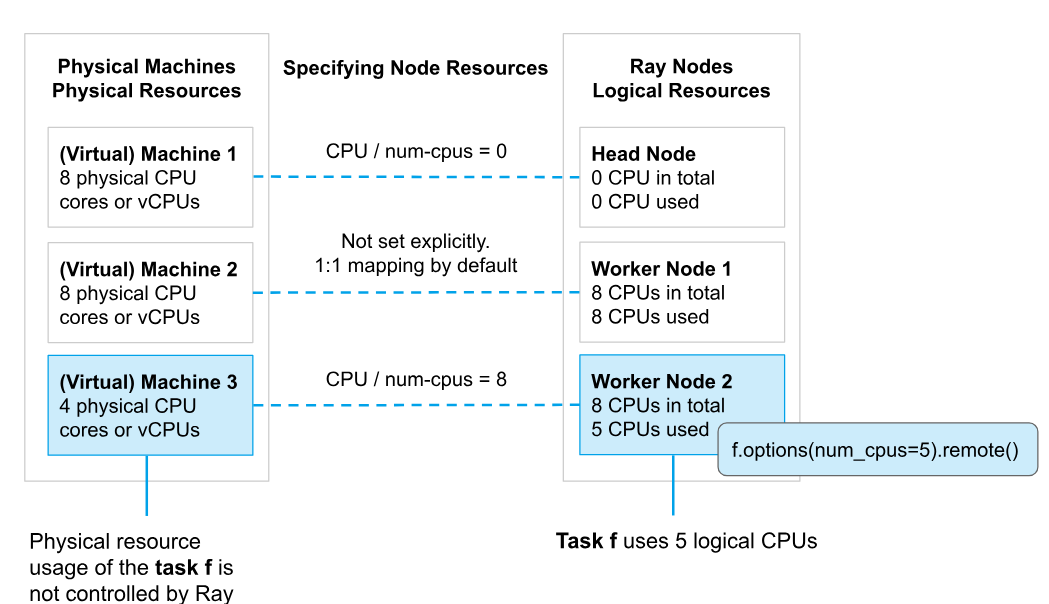
资源初始化:每个节点通过ray.init(num_cpus=?,num_gpus=?,memory=?,custom_resource=?)进行资源初始化
资源用键值对表示:键为资源名称,值为浮点数
使用逻辑资源抽象:不需要物理资源建立一对一映射
通常CPU的使用不会隔离,而GPU的使用会隔离
节点的状态(针对需要资源的任务或参与者):
可行:又分为可用(具有资源且此刻可使用)与不可用(具有资源但此刻被占用)
不可行:节点无法分配所需的资源
加速器资源:支持GPU,TPU,NPU等等
Ray内部可通过改变环境变量CUDE_VISIBLE_DEVICE在任务或参与者进程中只暴露分配给他们的GPU资源,也可人为在外部设置环境变量隐藏某些物理设备。
碎片化分配:分配加速器的数量可以是小数,使得多个任务可共享同一加速器
可强制指定加速器类型
内存资源:
Ray系统内存:用于存储每个节点信息,每个节点上的进程信息等内容
应用程序内存:
工作堆
对象存储内存:应用程序通过ray.put在对象存储创建对象以及从远程函数返回值时使用的内存
对象存储共享内存:应用程序通过ray.get读取对象时使用的内存,通常节点上若已存储该对象,则无需额外的分配
调度策略: 决定可行节点中的最佳节点
默认:根据利用率由低至高排序取前k个节点,再随机选择。对于不需要任何资源(num_cpus=0)的任务,会随机选择一个节点。
Spread:将任务分散到全部节点。
Placement Groups(置放组): 允许用户跨多个节点进行组调度,可用于安排任务和参与者,使其尽可能靠近本地(PACK)或分散(SPREAD)。
Buddle(捆绑包):将一系列资源打包成捆绑包,作为预留资源,仅通过专门操作才能调度这些资源。
Placement Group(置放组):一组捆绑包列表,根据集群节点的放置策略放置捆绑包
Ray集群 由单个头节点和任意数量的连接工作节点组成,Ray中节点的最小单位是服务器
头节点:运行负责集群管理的单例进程,包括自动缩放器,GCS(全局控制服务),Ray驱动,其余功能与工作节点一致
自动缩放器(AutoScaling):根据负载动态增加删除工作节点
Ray驱动:接收提交的Ray作业,调度作业,将其分配至各工作节点执行。
工作节点:运行任务或参与者的用户代码
作业(Ray Jobs):单个应用程序,源自同一脚本的任务,参与者等集合。各个节点都可以通过Ray Job API或Python脚本来运行作业。
集群建立
使用Ray的配置文件,例如:
1
2
3
4
5
6
7
8
9
10
cluster_name: my_cluster head_node: node_ip_address: 192.168 .0 .1 node_name: node1 worker_nodes: - node_ip_address: 192.168 .0 .2 node_name: node2 - node_ip_address: 192.168 .0 .3 node_name: node3
使用CLI: ray start --head --port={port} --redis-password="{password}"
使用python脚本: ray.init()
集群连接(工作节点/主节点的其他进程 连接进主节点) ray.init(address="{ip}:{port}", redis_password={password})
实战 采用Python API的方式,而非CLI。
启动Ray并部署vLLM 1 2 3 4 5 6 7 8 9 10 11 12 13 14 15 16 17 18 19 20 21 22 23 24 25 26 27 28 29 30 31 32 33 34 35 36 37 38 39 40 41 42 43 44 45 46 47 48 49 50 51 import rayfrom vllm import LLM, SamplingParamsimport osos.environ["HF_ENDPOINT" ] = "https://hf-mirror.com" ray.init(num_gpus=8 , num_cpus=64 ) print (ray.nodes()) @ray.remote(num_gpus=2 ) class vLLMWrapper : def __init__ (self ): self.model = LLM(model="facebook/opt-125m" ) def generate (self, prompts, sampling_params ): outputs = self.model.generate(prompts, sampling_params) re_outputs = [] for output in outputs: generated_text = output.outputs[0 ].text re_outputs.append(generated_text) return re_outputs prompts = [ "Hello, my name is" , "The president of the United States is" , "The capital of France is" , "The future of AI is" , ] sampling_params = SamplingParams(temperature=0.8 , top_p=0.95 ) vllm_instance = vLLMWrapper.remote() generate_task = vllm_instance.generate.remote(prompts, sampling_params) generated_text = ray.get(generate_task) print ("Input Text:" )print (prompts)print ("Generated Text:" )print (generated_text)
部署多个vLLM并做数据并行推理 1 2 3 4 5 6 7 8 9 10 11 12 13 14 15 16 num_instances = 4 use_gpus = [1 , 1 , 2 , 2 ] vllm_instances = [vLLMWrapper.options(num_gpus=num_gpu).remote() for num_gpu in use_gpus] input_texts = ["Text 1" , "Text 2" , "Text 3" , "Text 4" ] generate_tasks = [vllm.generate.remote(text) for vllm, text in zip (vllm_instances, input_texts)] generated_texts = ray.get(generate_tasks) for text in generated_texts: print (text)
DP(Data Parallel) Rank调用 DP Rank :模型并行将数据集划分为多个子集,每个子集被分配给独立的进程(称为rank),因此DP Rank指这些并行训练的进程。
若推理则与上述大致一致;若为训练,还需要AllReduce同步梯度,通过ray.get()与ray.put()完成集合通信实现梯度的取入和取出。
多节点并发场景设计方案 主节点
服务器资源紧张
KV Cache莫名会申请特别多显存,即使长度等参数已经开的很小,有待研究
故简单模拟了大模型的行为。
1 2 3 4 5 6 7 8 9 10 11 12 13 14 15 16 17 18 19 20 21 22 23 24 25 26 27 28 29 30 31 32 33 34 35 36 37 38 39 40 41 42 43 44 45 46 47 48 49 50 51 52 53 54 55 56 57 58 59 60 61 62 63 64 65 66 67 68 69 70 71 72 73 import rayfrom vllm import LLM, SamplingParamsimport osimport torchfrom typing import List os.environ["HF_ENDPOINT" ] = "https://hf-mirror.com" ray.init(num_gpus=8 , num_cpus=64 , address="local" ) print (ray.nodes()) @ray.remote(num_gpus=1 ) class vLLMWrapper : def __init__ (self ): self.model = LLM(model="facebook/opt-125m" , ) pass def generate (self, prompts, sampling_params ): outputs = self.model.generate(prompts, sampling_params) re_outputs = [] for output in outputs: generated_text = output.outputs[0 ].text re_outputs.append(generated_text) return re_outputs @ray.remote(num_cpus=1 ) class vLLMScheduler : def __init__ (self, model ): self.bsz = 2 self.model = model def schedule (self, input : List [str ] ): results = [self.model.generate.remote(input [i:i+self.bsz], sampling_params=None ) for i in range (0 , len (input ), self.bsz)] results = [item for sublist in results for item in ray.get(sublist)] return results prompts = [ "Hello, my name is" , "The president of the United States is" , "The capital of France is" , "The future of AI is" , ] sampling_params = SamplingParams(temperature=0.8 , top_p=0.95 ) vllm_instance = vLLMWrapper.remote() scheduler_instance = vLLMScheduler.options(name="scheduler" , namespace="head" ).remote(vllm_instance) generate_task = vllm_instance.generate.remote(prompts, sampling_params) generated_text = ray.get(generate_task) print ("Input Text:" )print (prompts)print ("Generated Text:" )print (generated_text)while True : pass
工作节点 目前并无两台同一局域网下的设备,使用同个节点的两个Python进程模拟不同节点。
1 2 3 4 5 6 7 8 9 10 11 12 13 14 15 16 17 18 19 20 21 22 import rayif __name__ == "__main__" : ray.init(address="auto" ) scheduler = ray.get_actor(name="scheduler" , namespace="head" ) inputs = [f"test{i} " for i in range (10 )] if scheduler is None : print ("ModelServer not found in the cluster" ) else : result = ray.get(scheduler.schedule.remote(inputs)) print (result) while True : pass
输出 :
参考资料
https://github.com/OpenRLHF/OpenRLHF https://docs.ray.io/ https://zhuanlan.zhihu.com/p/678828949 https://www.usenix.org/system/files/osdi18-moritz.pdf:Ray : A Distributed Framework for Emerging AI Applicationshttps://openmlsys.github.io/ https://www.cnblogs.com/jsxyhelu/p/18155194 https://docs.vllm.ai/